Wednesday, March 2, 2011

The Shadow Knows

The Imperial Guard Shadowsword - its a formidable foe on the battlefield. Playing Chaos Space Marines, it seems the "good" guys always seem to have plenty of Imperial armor rolling around on their side of the game table. In an Apocalypse 40k game, you want a couple of these bad boys on your side. Their 96" Destroyer Strength main cannon can reach out and touch someone.


So what would happen if after a battle, my Chaos Marines were able to get their hands on one of these bad boys?

That's the idea behind this tank. The Imperial Army's pride and joy fallen into the hands of my traitor troops. Chaos Marines are not to neat and tidy so I figured this tank would have seen better days. A few coats of wash and some rust later... I had a beaten up tank that looked like it had seen some battles. Now my Chaos troops would want their enemy to know just who they were fighting. I needed something that would set this tank apart from all the others that might be in a huge Apocalypse battle. What better then an 8 point chaos star? Using the tank's entire hull as a canvas I free handed a huge star across it. It covered the top and extended down the sides of the tank with its longest point reaching all the way to the front.

There! Now people know who they are messing with. Glory to Chaos!

Strike from the sky!

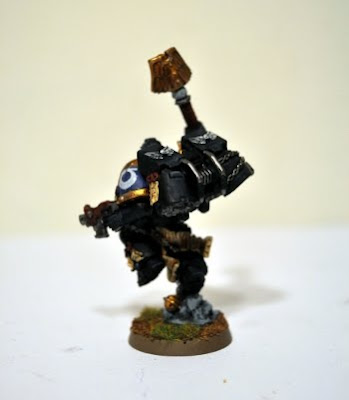
Myself and a group of my friends have been working on a Deathwatch RPG campaign. This of course gave us an excuse to glue up and paint some cool models. Deathwatch Marines are clad in black power armor, which can be a challenge to get right. Since the model is black you seem to lack the detail and shading that other colors provide. What I needed was a test marine to practice my black armor painting before starting on the real deal.

Enter the Space Marine Jump Pack Chaplain! Chaplains are also fond of black armor and since I had never painted this model before, he seemed the perfect test mule. The model was primed in black and then I went over him with a couple thin coats of Chaos Black. Once that was dry I blended a few layers of P3 Exile Blue to add some depth to the black. Then I finished up the blue with a small highlight of Skull White.


I feel the blue added to the black basecoat really give the armor a rich color. Its not just flat and plain anymore and the highlights along the ridges and where the natural light would hit finish off the effect. Hope you all enjoy it!


Saturday, July 31, 2010

Chaos Reaver Titan

Its been awhile since my last update, but that's not due to lack of material. My camera bit the dust leaving me high and dry with no way to capture any new minis painted. Now I have a nice new camera and I am back in action. First up is my Chaos Reaver Titan. Here are some work in progress photos. This truly is a great kit from Forge World. It took awhile to assemble and is taking even longer to paint, but it will be worth it in the end. I painted all the armor plates with a blend from red to Scab Red to try and stay true to my army's color scheme.


There is a lot of detail that needs to be painted, but I hope to move quickly now that the red parts have been completed. Its all metal trim and cables from here on out. The missile launcher on the top is missing the missiles since they have not been primed but the arms have been magnetized and and primed for painting next. I hope to have it completed by labor Day for a big Apocalypse Game, so stay tuned.

Friday, January 15, 2010

Children of the Khorne

After Painting up my Zhufor the Impaler model from Forge World, I had to snag a set of the Khorne Terminator upgrades. I combined the Forge World torsos, heads and shoulder pads with the Games Workshop legs and arms. The Bases are custom resin bases from Dark Arts Miniatures and I highly recommend them. After using these bases my friends and I have purchases many more sets. They are a great price and have great detail and quality.

This unit of Terminators will form the bodyguard for Zhufor the Impaler. I painted them using the P3 paints from Privateer Press and mixed with GW paints. The Banner I added so server as an Icon of Khorne for the unit and also to display the Black Hand Army symbol.


Sunday, October 25, 2009

Khufor and P3 - How I love thee!

So I have collected a huge amount of Forge World models and started to assemble/paint them. The first was the below model: Lord Zhufor the Impaler.

I loved this model and with my obession with anything khorne related I decided I must have him. After cleaning and assembling the model I primed it and then set about painting him. I was about to pick up my old trusty paints when my Girlfriend decided she wanted to head down to the local game store to pick up some more miniatures for herself to paint. I wandered around the paint area and was looking at the Privateer Press P3 paints. On a whim decided to pick up a couple shades of red and try them on the Zhufor model. Boy am I glad I did, after the first night of painting I went back to the store and bought an arm full of P3 paints. I love the way they blend and cover.

Anyways, on to the model. here are some shots I took of the finished Lord Khufor model. The resin allows for so much detail and I really enjoyed painting him.


Thursday, October 1, 2009

Marked for Termination

This is a unit I finished awhile ago, but only now had time to photograph. A 5 man terminator squad complete with an Aspiring Champion, Reaper Autocannon, Chain Fist, and a Power Fist. I tosse din a couple Combi Meltas for added measure. This is my take all comers squad. Some ranged support from the reaper autocannon with the combi meltas for backup if they get close to something big. and in close combat they have the power fist and chain fist for big armor.

Photobucket


Photobucket

Photobucket

Photobucket

Photobucket

And a full squad photo....

Squad Amber

I wanted my army to all be the same color armor wise, so all the tanks and troops have a matching scheme. I plan to change the color of each units shoulder pads to help tell them apart and add some color so each unit does not look the same as the last. Here is Squad Amber, worshipers of Tzeentch. Its a 10 man unit with Icon of Tzeentch, Melta Gun and an Aspiring Champion with a Power Fist.


Here is are shots of the unit as a whole.


Saturday, April 11, 2009

> Daemon

Finally pictures of my Chaos Greater Daemon. I have had this painted for awhile now but finally got around to posting it. The model kit comes frm the Lord of the Rings line by GW. I was looking for a Greater Daemon for my Chaos army and was having trouble finding anything I liked. While at the local game store with a friend I was browsing the shelves. She pointed to this model and said there is a daemon that looks cool. I have always like the Balrog from the Lord of the Rings movies, and when I think of a daemon, I think of a huge, flaming, winged monster and this fits the bill!


Friday, February 13, 2009

Long Live the Prince!

My Daemon Prince is one of my favorite models that I never get a chance to play. He was one of the first models I got and painted for my chaos army. With all the neat characters and models and covnersions I have done, sadly he get set aside for other HQ units in many games. He spends a lot of time sitting on my shelf while Kharn gets to ride around in my rhino with alll his berserker friends.


So I decided I need to use my Daemon Prince more and get him in some games. One thing that kept me from using him is the fact that he is all metal and I have not had a chance to varnish him with some matte varnish. The paint tends to chip during games or in transporting the metal models if you are not careful and varnish will help keep that paint lasting longer. With the bad winter weather here in Rochester, I had not had time to take him outside and spray him with some varnish. Well finally I had a nice weekend with the chance to varnish my Daemon Prince. I headed down tot he game store to do some priming and painting and I brought him along. I laid out my models on a table and my primer and clear coat etc. That was my mistake.


While I was chatting with fellow gamers and comparing models and swapping tales I grabbed my Daemon prince and what I thought was the varnish. I went outside to prime and shook up my varnish and started to apply the first coat to the model. Out of the nozzel spewed a fine mist of white primer. I stopped as quickly as I could, but not before the whole front of my Daemon Prince was covered in a nice white haze of primer.

I had to bring in my poor Daemon prince back in and face the gasps and groans of my fellow players, who all have probably done this at one point. So I went home that night and restarted touching up the Daemon Prince so here he is, repainted, and this time varished with actual clear coat.


Saturday, January 24, 2009

Berserkers Done!

I had been slacking in the Khorne department lately. Out of my 40 Primed Khorne Berserkers I only had 10 painted. I knew I needed to step up and finish a few more units, but these guys take time if you want to do them right. All that trim, chains and bullets they carry around add up to some major detail when you working a big group of them. I was scheduled to work from home with week with a support pager and my laptop in case any IT groups needed my help. While I was getting paged a lot, it did give me some time to sit down and work on these guys.

Long story short, 30 of the lil crazies are all painted up and ready to rumble. I showed a few to a friend and he commented on the nice red color and shading. Might be hard to tell from these photos but I worked to shade deep shadows in areas and bright red highlights.


I figured I would post up the steps I used to paint my Khorne Berserkers in case anyone was interested in trying it on their units.

Step 1: Prime the units black. White primer might change the color slightly, all mine were done in black primer though so I cannot test a mini yet to see if the primer would change the color any.

Step 2: Base coat the models in Foundation Mechrite Red.

Step 3: Use Delvan Mud wash to shade the shadows on your model. I also used it around the boots and on lower pieces of armor to show wear and fading. Also on the underside of arms and shoulder pads.

Step 4: Mix 1/3rd Blood Red to 2/3rds Baal Red Wash. Then lightly brush this over areas to create highlighted patches from a light source.

Step 5: Paint the Berserker trim using Brazen Brass.

Step 6: Thin down Burnished Gold with water, about a 50/50 ratio. Then apply it to the areas on the trim you want to highlight. Usually around the same areas that you added the Blood Red wash.

Step 7: Use Gryphonne Sepia wash and cover the trim and red areas on the model. This helps the trim shine and gives some depth to any red areas.

Then paint the rest of the model as you see fit. This method would also work well on other red units like Blood Angels. Without all the trim that Khorne Berserkers have, Blood Angels would be a quick process and would really add some pop to the models. Enjoy!